Website Quick Start Guide
TIPS ON UPDATING YOUR THERAPYTRIBE THERAPIST WEBSITE: Our websites are designed using WordPress, a popular platform built for ease-of-use. But in-case it’s not obvious to you right off the bat, here are a few tips on how to get started on personalizing your TherapyTribe website…
How do I login to my website?
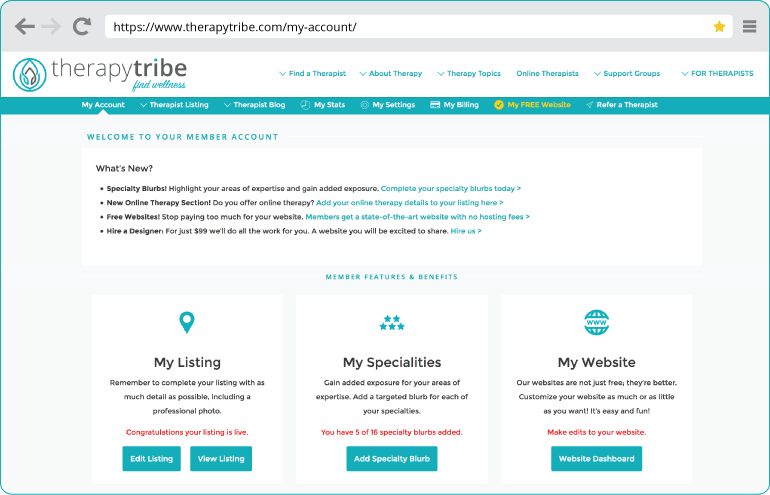
To edit your website login to therapytribe.com and go to My Account > My Website. If you are logged in, you will see a blue bar at the top of your website. Take notice of these shortcuts:
- Edit the page you are viewing by selecting “Edit Page.”
- Edit your header area or theme by selecting “Customize.”
- Your “Dashboard” is where you access all your websites pages and designs options. Here you can follow our 3 step instructions to get your website live.
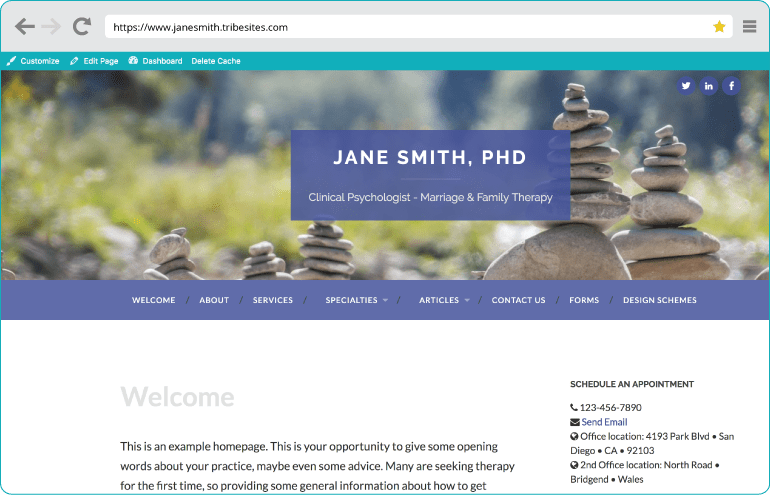
Your Website – Logged In
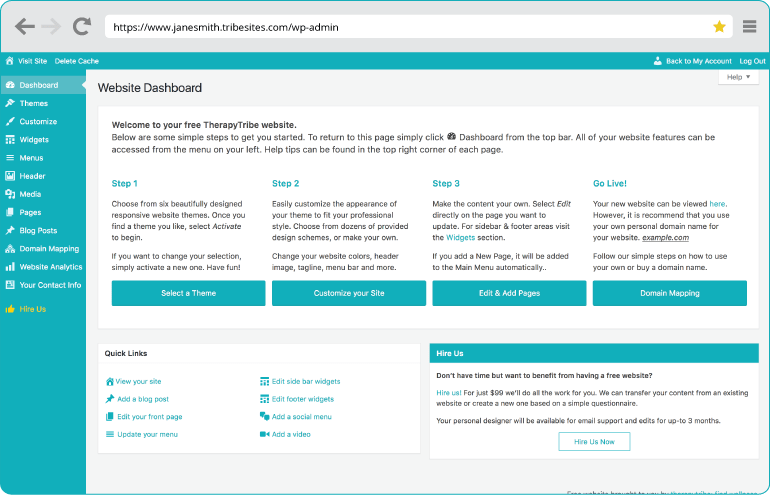
Your Website Dashboard
How do I change my Theme or Design Scheme?
There are two levels of design available – theme & scheme. Click here to view existing design options.
1) First you select your Theme, which dictates the layout of your website, including header placement and page layout. To choose a Theme go to Dashboard > Themes > Rollover Thumbnail > Select “Activate.”
2) Once you choose a theme, you can customize the Design Scheme. This includes the header image, nav bar colors and more. Go to Customize > Design Scheme. Here you will have a choice between: “Select a Design” or “Make Your Own.” Choose the design you like. Select “Save & Publish” at the top of the page! X out of the Customizer to view your website design changes.
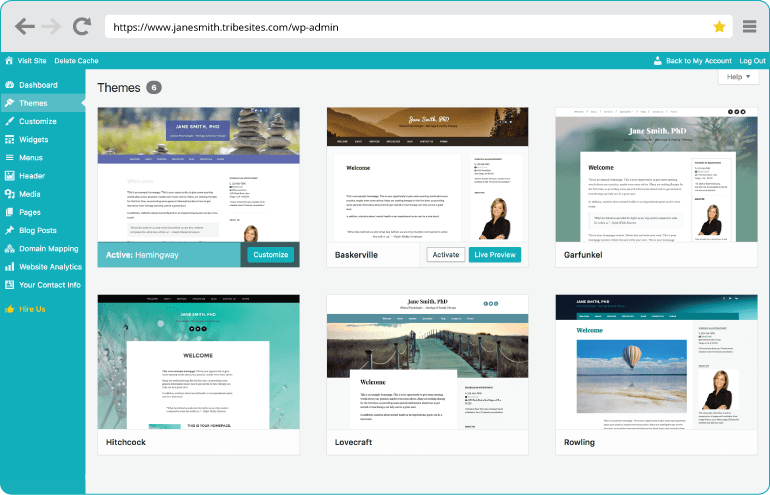
Choose a Theme

Design Scheme
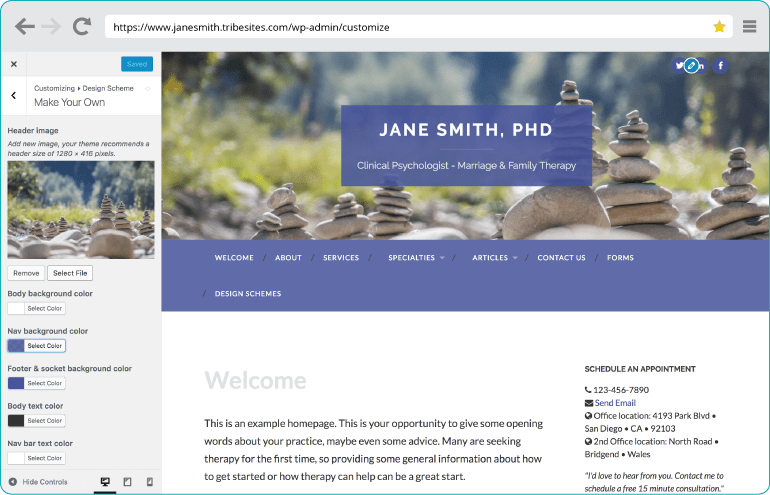
Make Your Own
Design Tips: There are no limits to what you can choose with regards to imagery and colors. There are a few great resources for royalty free imagery: unsplash.com, pixabay.com, pexels.com. Make your website represent your unique practice. Need help? Use our hire us service and our professional designers will do all the work for you!
How do I edit my website title and tagline at the top of my website?
To edit your Site Title and Tagline used at the top of your website go to Customize > Site Identity.
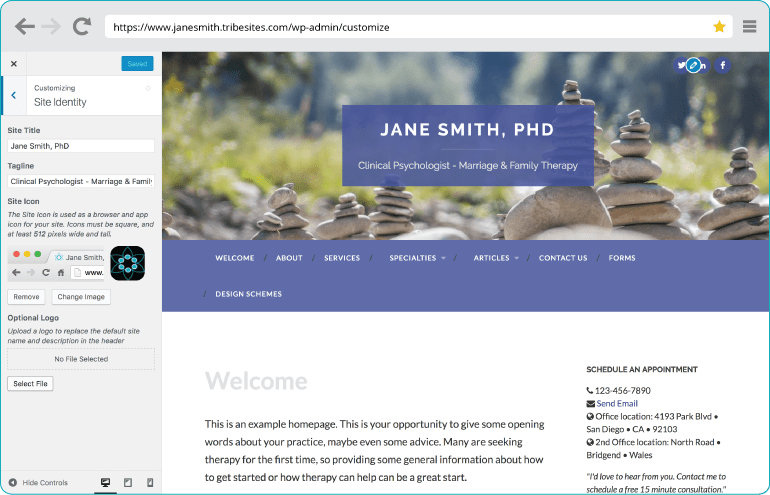
Site Title & Tagline
– You will see a column pop-up on your left hand side.
– Type the desired title and tagline in the labeled text boxes.
– Select “Save & Publish” at the top of the page.
– You will need to X out of customizer to see your new title and tagline displayed on your website.
How do I add a site icon or logo to my website?
To add a Site Icon and/or Optional Logo, go to Customize > Site Identity.
Site Icon & Logo
– You will see a column pop-up on your left hand side.
– Choose “Select File,” and follow the instructions to Upload an image from your computer or media library.
– Select “Save & Publish” at the top of the page. You will need to X out of customizer to see your new title and tagline displayed on your website.
The ideal site icon size is 512px by 512px square and will be displayed on your website tab as well as in browsers as an icon for your website. The Logo will replace your name & tagline area. The ideal logo size is 500px wide by 200px high.
* If you are interested in a custom header and logo for your website please choose the “hire us” option for your website.
How do I edit an existing Webpage?
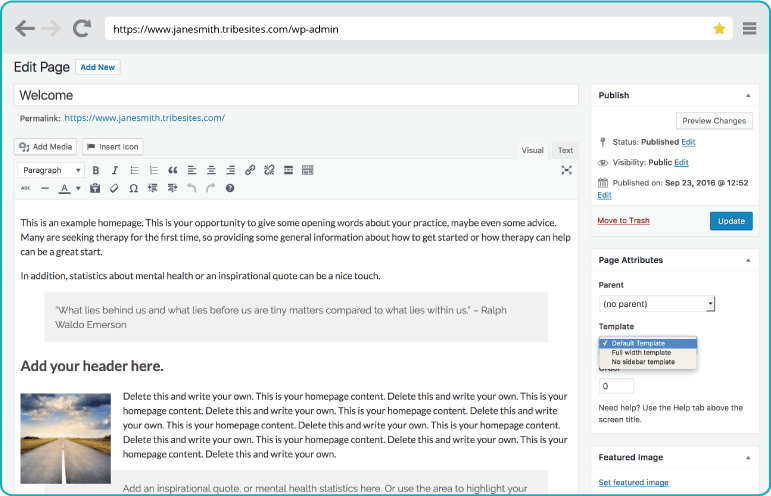
To edit the body of a webpage simply select “Edit Page” at the top of any page.

Dashboard > Pages
Edit Page
<< You will be shown an open box editor that will allow you edit the page just as you would a word document. Anytime you want to save your work, select “Update.”
You can view a list of all your pages if you go to Dashboard > Pages > All Pages. From here you can choose to view, edit, delete your pages. >>
How do I add a new Webpage?
To create a new page go to Dashboard > Pages > Add New. (Or, select “Add New” from the Edit Page screen.)
Add Page
Dashboard > Pages
Add your content to the editor as desired. To create your page select “Publish.” Your page URL will be created based on your page title, this can be edited as you wish. Once you publish your new page it will automatically be added to your Menu.
You also have the option to change the page Template between “Default” (this includes a sidebar) or “Full Width Page” (this has no sidebar). These options are located to the right of the page editor. *Some templates do not have a sidebar. >>
How do I add an image to my website?
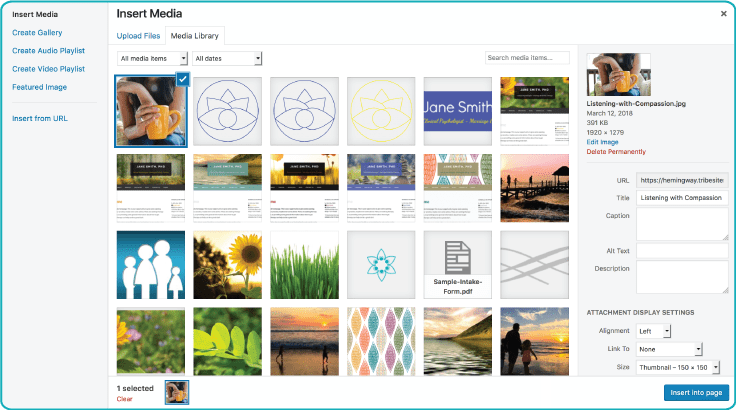
It’s simple to add an image to any web-page. Go to the page you want to add an image, and select “Edit Page.” Then, place your cursor in the editor window where you want the image to appear. Select the “Add Media” button above the text editor.
Adding an Image
Here you can choose from your Media Library or Upload your own image from your computer. Select the image you want to by clicking on it.
Note: You need to select your image size and desired alignment (left, right, center). It is also a good idea to add a Title and Alt Text to your selected image. These options are located on the right hand side of the page, under Attachment Display Settings. Once your image is configured, select “Insert into Page.”
Select “Update” in the top right hand corner of your editor. To see your page live, click on the link at the top of the page. To edit your image simply return to “Edit Page” and click on the image within your text editor. A small edit box will pop up for you to use.
How do I add a link to a PDF form to my website?
It’s simple to add a link to a PDF file to any web-page. Go to the page you want to add the PDF link to. Select “Edit Page” and place your cursor in the editor window where you want the PDF link to appear. Select the “Add Media” button above the text editor.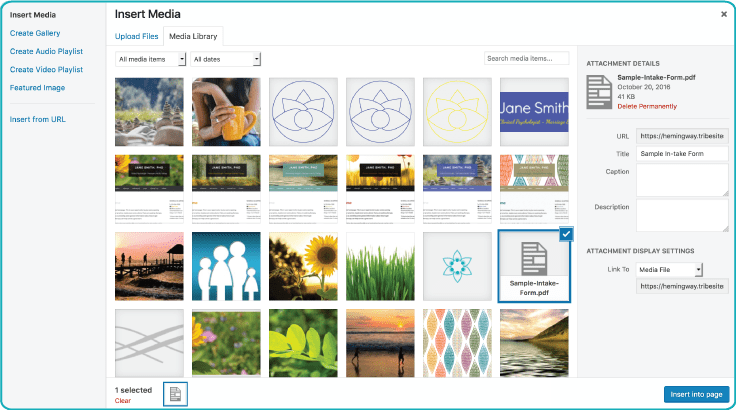 Here you can choose from your Media Library or Upload from your computer. Once uploaded the PDF file will be displayed in your media library similar to an image. Select the file by clicking on it.
Note: You need to review the Title and Attachment Display Settings for your selected PDF. This is located on the right hand side of the page. The Title will become the name of your link. Set your “Attachment Display Settings” as, Link to: Media File.
Once your PDF is configured, select “Insert into Page.” You will see a link appear within your page. Select “Update” in the top right hand corner of your editor. To see your page live, click on the link at the top of the page.
To edit your PDF link return to “Edit Page” and click on the link within your text box. A small edit box will pop up for you to use. To edit your PDF link to open in a new widow, go to Edit Icon (pencil) > Settings Icon (gears) > Select “Open in new window”
How do I add Video or Audio to my website?
There are two options for adding video and audio to your website:
- You can add a video or audio file to your Media Library. However, there is a 1MB size limitation for media files, this is to protect your website load times.
- (Recommended) You can simply add a link to a video hosted on YouTube or another video service. Go to the page you want to add the video and select “Edit Page.” Place your cursor in the editor window where you want video to appear. Copy and paste your YouTube link anywhere on the page, and the video will automatically appear.
Is my website Search Engine friendly? How do I add/edit the meta data for my website?
Yes. Each page of you website has a Title and Description automatically generated based on your TherapyTribe listing. This is called meta data and is seen by search engines only, not users. If you would like change the title and description for a particular page select “Edit Page” and scroll to the bottom. You will see a box called SEO, where it shows your current Title and Description. Make edits as desired and select “Update” to save your changes. Read more about what makes a good title and description here.* Note: the content of your page is more important than your meta data. It is recommended that your key pages contain 300 words or more, and focus on content that is unique and relevant to your desired clientele. To have your meta data reviewed by an expert, login to your account and select the “hire us” option for your website.
How do I add a Blog article to my website?
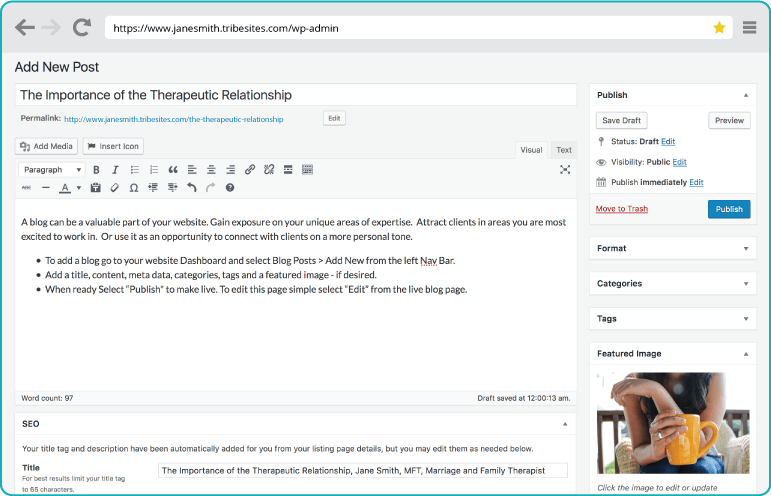 – Add a title, content, categories, tags, SEO title/description and a featured image – if desired.
– When ready Select “Publish” to make your blog post live.
– To edit your blog post simply select “Edit Post” from the live blog page.
– To delete your blog post select “Move to Trash” from the right hand side of the page.Note: Your blog posts will automatically appear under your blog or articles section of your website accessible from your menu bar. In addition, a list of your blogs will appear in your sidebar area. Finally, your blog tags will show up in the footer area of your website. These can be modified if desired, see widgets & menu’s for more details.
How do I edit my Sidebar & Footer areas?
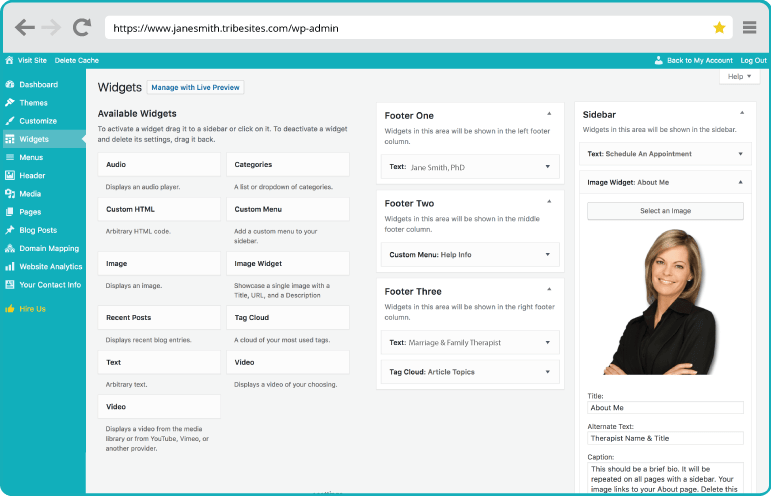 To get started, go to Dashboard > Widgets. Or, Customize > Widgets.
Here you will see a list of available widgets, as well as the areas they are used. These areas are listed as Footer One, Footer Two, Footer Three and Sidebar.Click the arrow on the upper right corner of your desired area to expand and view the content within that area.
– To edit the content, simply click to expand the widget, update as needed and select “Save.”
– To remove a widget, simply click to expand the widget and select “Delete.”
– To rearrange your widgets, drag and drop them in the order you desire and select “Save.”
– To add a new widgets drag it from the column of Available Widgets on the left, add it to the desired location, add desired content or select the relevant options and select “Save.”
What is a Menu and how do I make updates?
Menu’s are your website Navigation areas and link to the pages within your website. Do not delete a menu entirely as this may cause navigation issues. Please note all our themes have 3 different menu types:
- Main Menu (Primary) This menu is at the top of your website and should remain set to “Primary.” If you created a New Page, it will automatically be added to your Main Menu. Likewise, if you delete a page it will automatically be removed from your Main Menu.
- Footer Menu (Help Info) This is a menu that shows up in your footer area and includes less important pages such as Resources, Terms, etc.
- Social Menu (Social Media) This is an optional menu located at the top of your website. Here you can add links to your social media pages like Facebook, LinkedIn, etc.
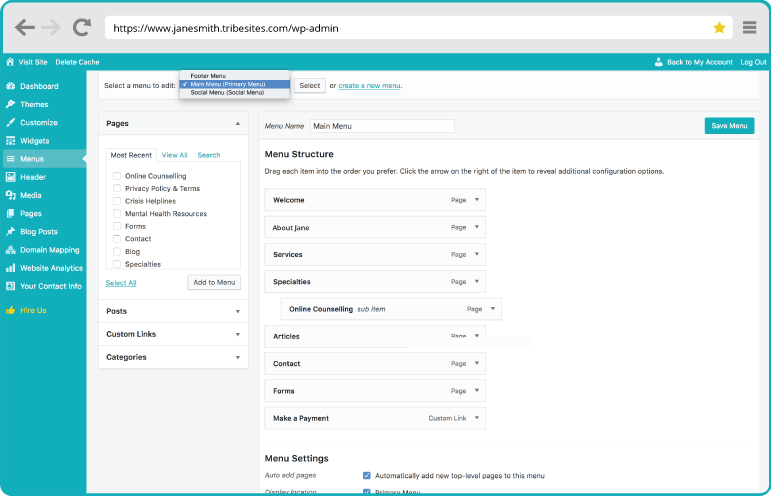
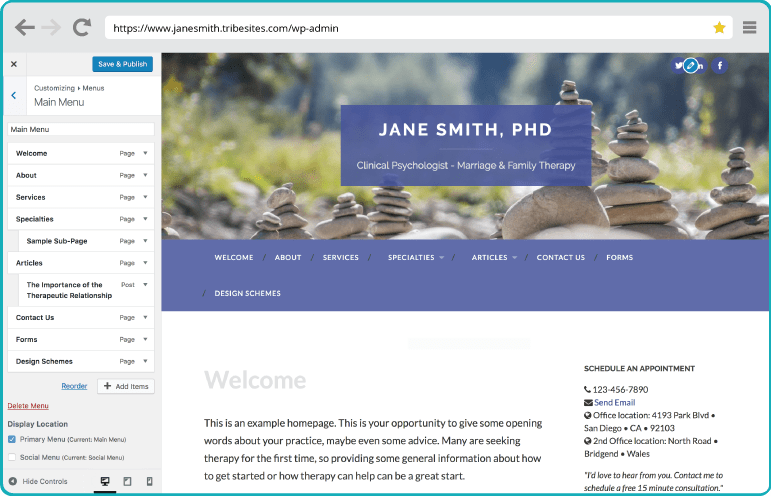 << To edit your Menus go to Dashboard > Menus. Select the menu type you would like to edit from the dropdown. Choose Select to see the menu on your screen. (Recommended)
Or, go to Customize > Menus and select your menu type. >>
Remember, after making any changes don’t forget to select “Save Menu” or “Save & Publish” at the top of your screen.
How to edit your menu:
- To rearrange the order of a menu item simply drag and drop it to the desired location.
- Drag a menu item to the indent position to make a sub item. This will create a dropdown menu.
- To add a new menu item select a page, post or link from the column on the left. Select Add to Menu.
- To delete a menu item click the arrow to expand and select “Remove.” (Note this will not remove a page, it will just remove it from the menu.)
- To add a link to your menu that goes to a page outside your website, select “Custom Links,” from the column on the left and add your desired URL. Select “Add to menu.” Be sure to expand the box and select “open link in new tab,” so users don’t lose your website. If you are adding a link to your social menu, it will automatically add the associated social icon.
How do I update my contact info and address on my website?
Your website Contact Us page is automatically created for you based on your TherapyTribe listing page.
To update your address, phone number or email address please edit your listing page and your website will be updated automatically.
If you want different information displayed on your website than is generated from your listing simply remove the shortcodes [ts-phone] or [ts-address] from your contact us page and type your address or phone number as desired. Note: Your email address is required to stay the same, as it is tied to the contact form provided.
– To edit your listing login to therapytribe.com, go to My Account > Edit Listing.
– To edit your Contact page go to My Account > My Free Website > Edit Page.
Can I use my own domain name?
Yes. You will be provided with a temporary domain name when you first create your new website. You can then choose to keep this domain or map your website to any domain you own. For domain mapping instructions go to Dashboard > Domain Mapping. Owning your own domain is recommended, but not required. Owing your own domain name is very inexpensive and can be an important asset for your business. A good domain is succinct and relevant to your practice. (i.e. janesmiththerapy.com; locationtherapy.com.) If you do not own a domain name, but would like to, Hover.com offers affordable rates and good customer service.
Need help? Don’t have time to create your website yourself?
No problem. Hire us for a one-time fee of $299 and we’ll do the work for you. Login to your TherapyTribe account to Hire Us >

We can transfer your content from an existing website or create a new one based on a simple questionnaire. Included in this service is custom imagery and logo that suits for your practice style, marketing advice and a review of your website for best-practices in search engine optimization.
See examples and what our members are saying about our website service: Read Testimonials >